How to Hang Floating Shelves with Keyhole Hangers
Hi all! We’re so excited to bring you our very first blog post! Today we’ll be sharing a fool-proof way to hang our floating shelves using the keyhole hangers provided (or anything else with keyhole hangers!). We love using these hangers, because they keep whatever you’re hanging nice and flush on the wall. Be sure to download the PDF at the bottom if you’d like to save this for later! So let’s get right into it!
Love it? Pin it!
Disclosure: The links provided may be affiliate links. That means by shopping these links, we make a small commission at no extra cost to you! We only promote what we actually use. :)
Step 1. Using a tape measure or ruler, measure down from the top of the shelf to the top of the hole on the keyhole hanger. Do the same for the other side in case there are any discrepancies and take note of your measurements. Lay a piece of tape across the back of the shelf, making sure you are aligned with the top of the shelf and covering the keyhole hangers, and also exceeding the edges (important). Press firmly near the hangers.
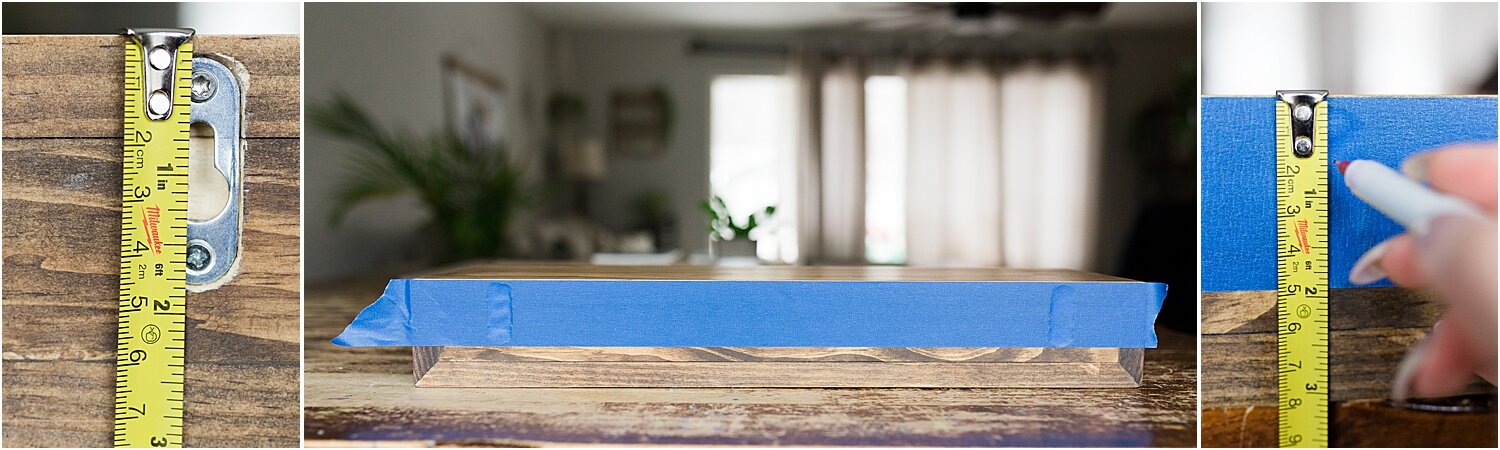
Step 2. If you’ve pressed hard enough to make an impression of the keyhole hanger on the tape you don’t need to take the tape measure out again (seen in the right photo above). Find the middle of the keyhole hangers where your screw will go and make a mark using your measurement from earlier if necessary, and poke a hole.

Step 3. Using a level and a pencil, make a few small marks on the wall where your shelf will hang (this could be the very first step, we didn’t think of it at the time but that’s probably what I’d do in the future). This will also ensure you apply the tape straight on the wall. Now fold over the ends of the tape to make the non-sticky side sticky (see photo below). Remove the tape and stick your folded edges to the wall using your marks as the guide. Find the holes you made in the tape earlier and mark your holes on the wall with a pencil.

Step 4. Remove your tape to expose your marks on the wall where the screws will go. If you are going into a wall stud, you do not need anchors, and you should use a drill. Anchors are for going through sheetrock only. Once both screws are in, you are ready to slip on your shelf! If the shelf wiggles at all, tighten the screws a little bit at a time until the shelf sits flush on the wall (or loosen the screws if you are having trouble slipping them on). That’s it!

Enjoy decorating your beautiful shelves!

These floating shelves are made out of select pine and are two inches thick. Choose between 7” and 11” deep by varying lengths. Shelves are built to look like a solid piece of wood without the added weight! Made of REAL WOOD. While we do our best to select the best pieces to work with, sometimes small knots or natural imperfections may be present in the wood. Hanging hardware included.
We typically ship on a 2-3 week turnaround time, though it may take longer during the holidays. Be sure to click through the images to see the color options before checking out. Enter discount code PICKUP to eliminate shipping costs if you will be picking up your order in Lanoka Harbor, NJ (08734).
Please CONTACT US for a custom size.